
Getting Started Without The Overwhelm
Creating your first string planter (jak zrobić kwietnik ze sznurka) might feel a bit intimidating, but it's easier than you think if you take the right approach. This section simplifies the process into manageable steps, giving you the confidence to get started. We'll cover common concerns and offer advice from seasoned crafters to guide you through your first project.
Choosing Your First Project
Complex designs can often overwhelm beginners. For your first try, choose a simple, single-color spiral planter. This basic design teaches essential techniques like coiling and knotting without requiring complicated patterns. It's like learning basic stitches before starting a complicated knitting project. This foundation will set you up for more complex projects down the line.
Setting Up Your Workspace
Having a dedicated workspace, even a small one, can make a big difference in your crafting experience. Find a well-lit area where you can comfortably lay out your materials and work undisturbed. A clean, organized space helps you focus and minimizes frustration. This dedicated area can become your personal creative haven.
Overcoming Common Fears
Many beginners hesitate, worried they don't have the "artistic talent" for string planters. But jak zrobić kwietnik ze sznurka is less about inherent artistic ability and more about following instructions and practicing techniques. Just like learning to ride a bike, it takes practice and patience. Remember, every expert was once a beginner.
Staying Motivated
Crafting can be a rewarding experience, providing a sense of accomplishment and relaxation. But projects can also be tough. To stay motivated, break down your project into smaller, manageable goals. Celebrate each step—finishing a coil, mastering a new knot—to keep your momentum going. This approach turns potential frustration into a series of small wins.
Realistic Expectations
Your first few planters might not be perfect, and that's okay. Embrace imperfections as a part of learning. Each attempt refines your technique and builds your skills. Focus on progress, not perfection. Like any new skill, mastering jak zrobić kwietnik ze sznurka takes time and effort. But the rewards are worth it. By the end of this section, you'll have a plan and a positive mindset, ready to start your string planter journey.
Essential Materials That Actually Matter
Creating stunning, long-lasting string planters (jak zrobić kwietnik ze sznurka) depends heavily on choosing the right materials. Let's skip the marketing jargon and focus on what truly works for projects built to last.
Choosing the Right String
Your string choice significantly impacts your planter's final look and how well it holds up over time.
-
Jute: Known for its natural, rustic look and strength, jute is also biodegradable and budget-friendly. However, it can be rough on the hands and may not be ideal for intricate designs.
-
Cotton: Softer than jute and available in a wider array of colors, cotton string works well for detailed patterns and is comfortable to use. Keep in mind, though, that it's not as durable as jute, especially outdoors.
-
Hemp: Combining a similar aesthetic to jute with even greater strength, hemp string is a durable and sustainable option. It can, however, be more expensive.
-
Synthetic Strings: Materials like nylon or polyester provide superior durability and weather resistance, perfect for outdoor planters. They may, however, lack the natural appeal of jute, cotton, or hemp. Check out this resource for further inspiration: How to master different materials in your next project
To help you choose the perfect string, take a look at the comparison table below:
String Material Comparison For DIY Planters
Detailed comparison of different rope and string materials showing durability, cost, appearance, and best use cases
| Material Type | Durability Rating | Cost Level | Best For | Weather Resistance |
|---|---|---|---|---|
| Jute | Medium | Low | Rustic, indoor planters | Low |
| Cotton | Low | Low | Detailed, indoor planters | Low |
| Hemp | High | Medium | Rustic, indoor/outdoor planters | Medium |
| Nylon | High | Medium | Outdoor planters | High |
| Polyester | High | Medium | Outdoor planters | High |
This table highlights the strengths and weaknesses of each material, making it easier to choose the best string for your specific project. Consider the location of your planter and the level of detail you want to achieve.
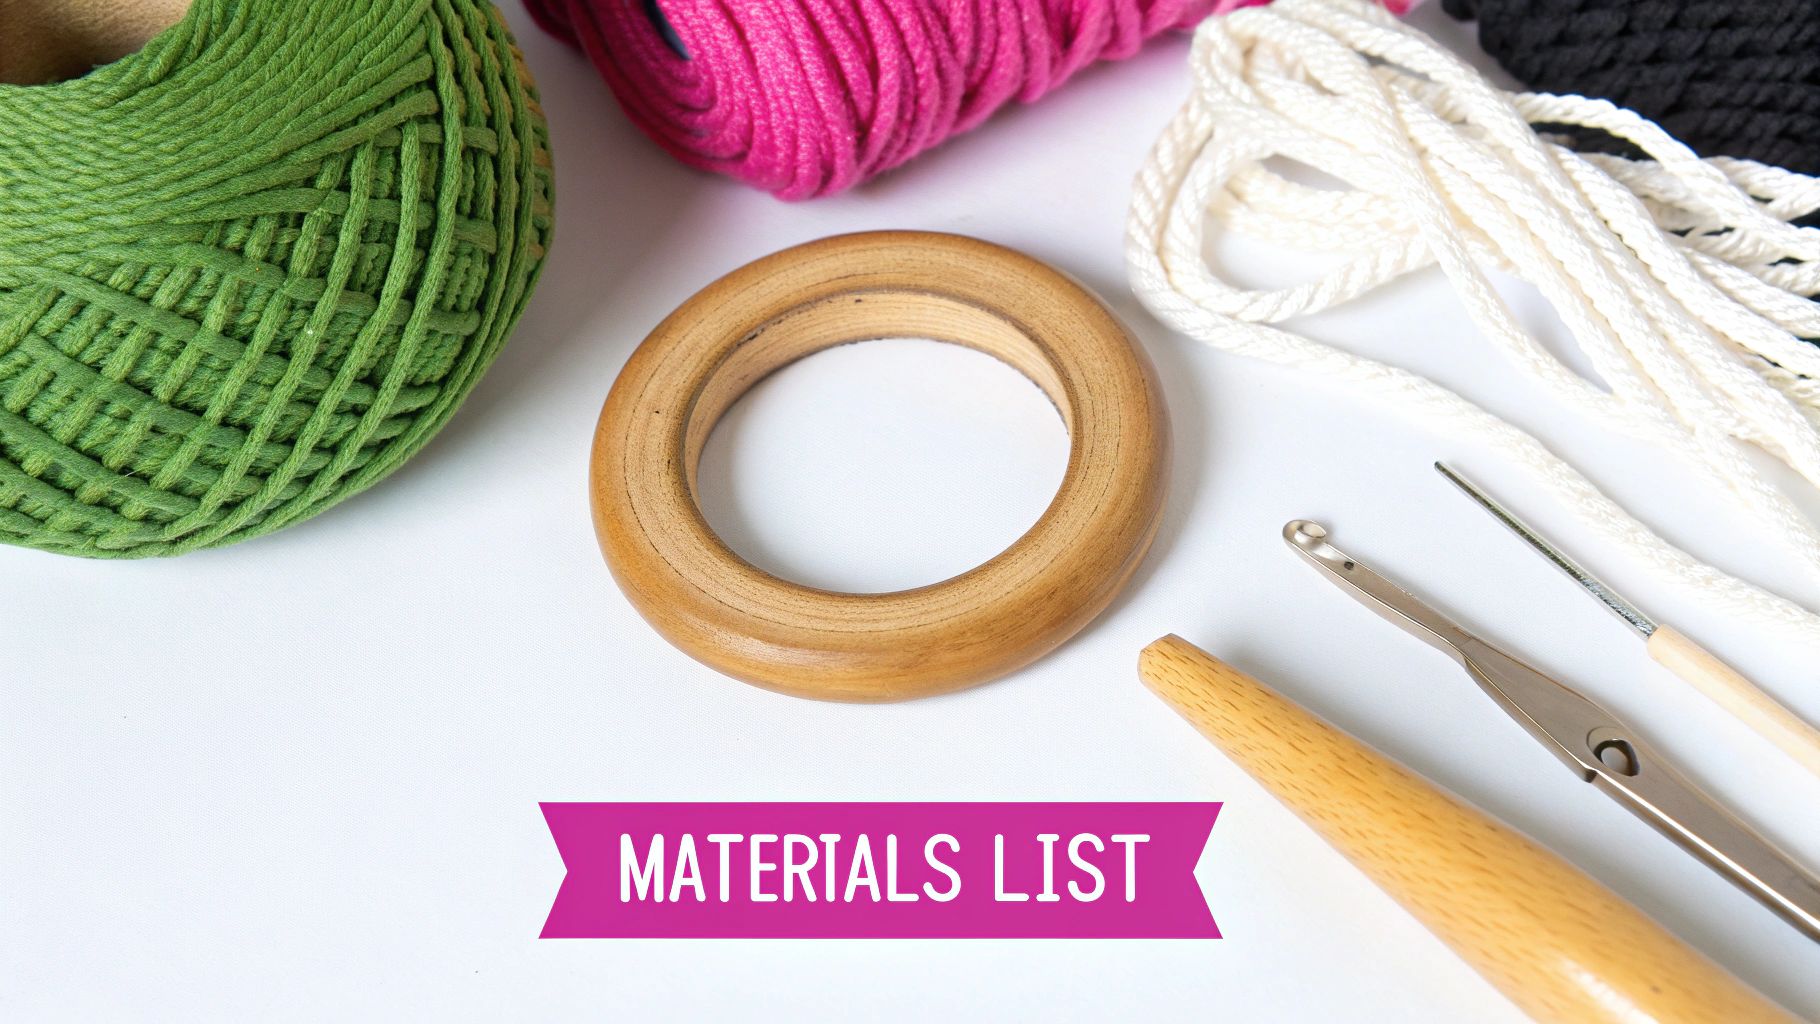
Essential Tools
You don't need specialized macrame tools to get started. Basic supplies will do:
- Sharp Scissors: Clean cuts are key to preventing fraying.
- Measuring Tape: Precise measurements ensure consistent results and minimize wasted string.
- Mounting Ring or Dowel: This forms the base for your planter.
- S-Hooks or Other Hanging Hardware: These are essential for displaying your finished piece.
Calculating String Quantity
Knowing how much string you'll need prevents running short mid-project. A good rule of thumb is to multiply your desired planter length by 4-6 times the string length, depending on the knot complexity. For instance, a 40-inch planter using 10-foot strings would need roughly 400-600 feet of string.
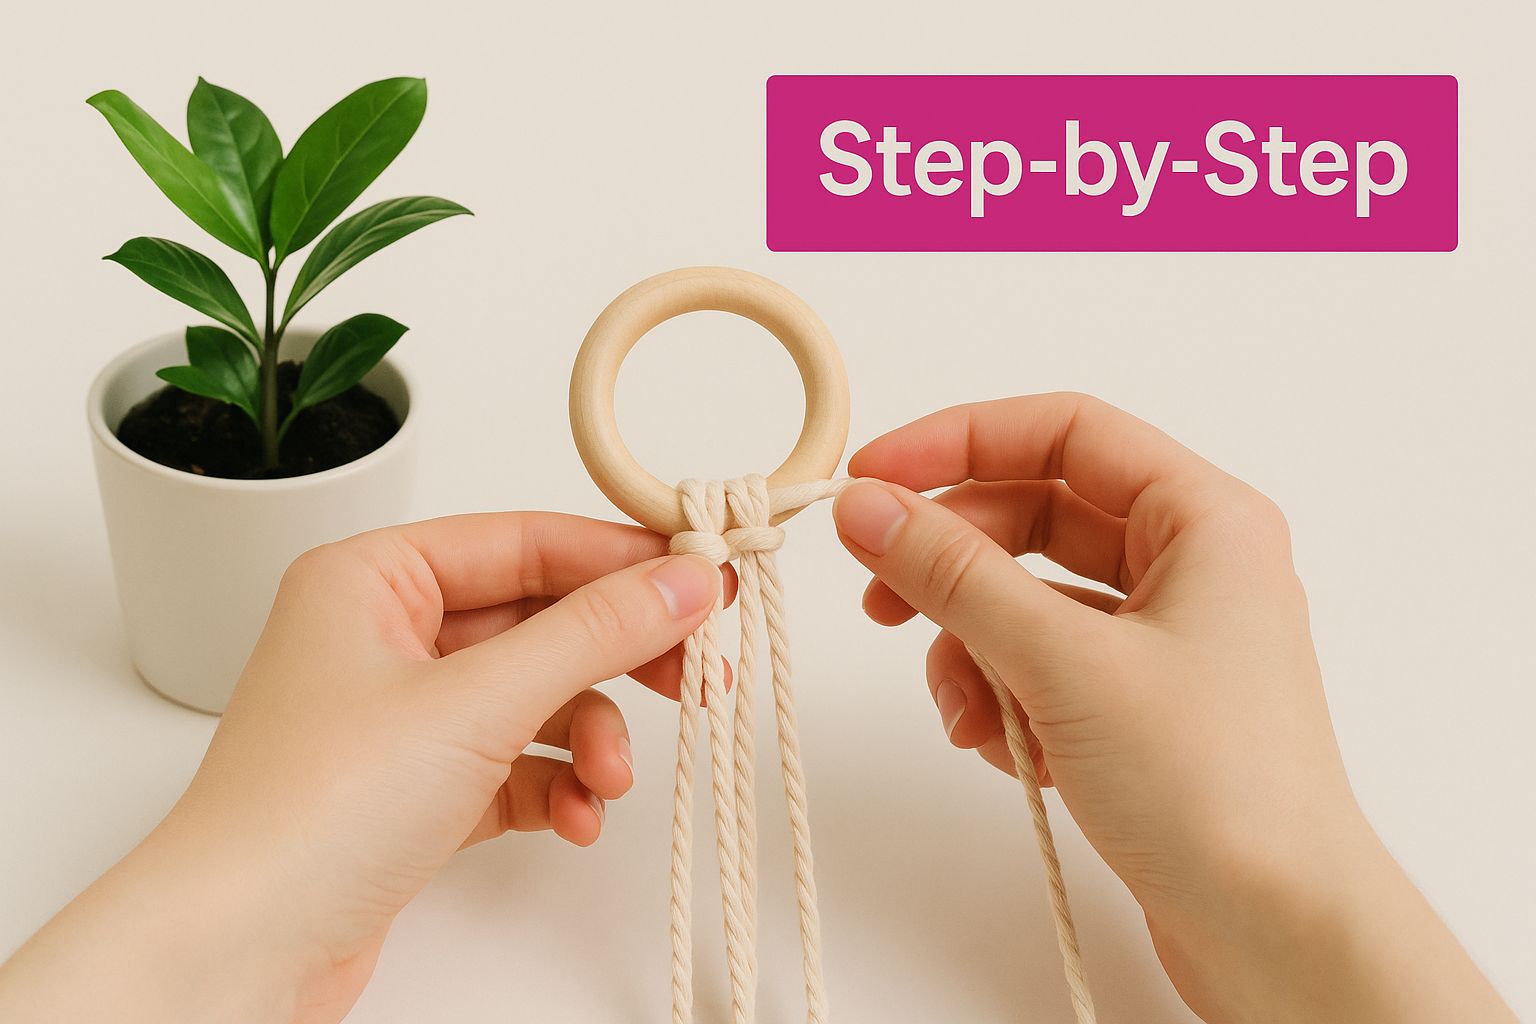
This infographic provides a step-by-step guide to tying a macrame knot, a fundamental technique for string planters. The visual cues make it easy for anyone, even beginners, to create uniform, symmetrical knots.
The growing popularity of DIY projects like string planters reflects a larger market trend. The Easter decorations market, which often includes spring garden decor, was valued at USD 124.28 billion in 2024. It's projected to grow at a CAGR of 6.2% until 2032. This growth is partly driven by the increasing demand for handmade, eco-friendly home accessories like "kwietniki ze sznurka." For more detailed market statistics, see: https://www.maximizemarketresearch.com/market-report/easter-market/191097/
Storing Your Materials
Proper storage prevents tangles and keeps your string in top condition. Loosely coil your string and store it in a cool, dry place away from direct sunlight. Avoid plastic bags, as they can trap moisture and cause mildew. These simple steps significantly extend the life of your materials. Selecting the right materials and understanding their properties is the foundation of crafting beautiful, long-lasting string planters.
Mastering The Foundation Techniques
Let's explore the core techniques that make creating a string planter (jak zrobić kwietnik ze sznurka) so rewarding. This section covers the fundamental methods, starting with the essential spiral coiling technique. This technique forms the base of many planters and is key to a polished final product.
The Art of Spiral Coiling
The spiral coil is the starting point for most jak zrobić kwietnik ze sznurka projects. Consistent tension is crucial for even coils and a sturdy planter. Think of it like coiling a garden hose: even loops create a neat pile, while inconsistent tension creates a tangled mess.
Smooth Transitions and Secure Foundations
Smooth transitions between coils are important for both the look and strength of your planter. Avoid sudden changes in tension, which can create weak points. Just like building a brick wall, each coil needs to be carefully and evenly placed for a strong structure. For more inspiration, check out Wiktoria Florek's Portfolio for examples of her art and design.
Troubleshooting Common Challenges
Even experienced crafters run into issues like uneven coils and loose sections. Addressing these problems early is important.
- Uneven Coils: Gently uncoil and rewind the uneven section, focusing on consistent tension.
- Loose Sections: Carefully tighten loose sections by adjusting the knots and pulling the string taut. Like tuning a guitar string, small adjustments can make a big difference.
- Joining New String: Make sure the knot is secure and flat against the previous coil for a seamless look and strong structure.
Step-by-Step Guide to Starting a Coil
Here’s a simple guide to get you started:
- Step 1: Secure the starting knot to your mounting ring or dowel.
- Step 2: Coil the string tightly around the ring, keeping each loop close to the last.
- Step 3: Maintain even tension as you coil.
- Step 4: Regularly check for unevenness or loose sections and adjust as needed.
This methodical approach helps develop muscle memory for beautiful results. With practice and attention to detail, you'll create stunning string planters. Remember, mastery takes time, so don't be discouraged if your first attempts aren't perfect. Each project is a chance to learn and improve your technique.
Advanced Patterns That Impress
Having mastered the basic spiral coil for your string planter (jak zrobić kwietnik ze sznurka), you’re now ready to take your skills to the next level. This section explores advanced weaving patterns, color techniques, and decorative additions that will transform your planters from simple to stunning.
Exploring Geometric Designs
Beyond the basic spiral, geometric patterns add visual interest and complexity. The diamond pattern, for instance, introduces a touch of elegance. It involves strategically crossing and knotting the strings to form diamond shapes within the planter. The spiral knot, a variation on the basic coil, creates a textured, swirling effect.
Mastering Color Transitions
Introducing multiple colors opens up a world of creative possibilities. Using a color wheel can help you choose harmonious combinations. Analogous colors (those next to each other on the wheel) create a smooth, blended look. Complementary colors (those opposite each other) produce a bold contrast. Gradual color transitions, achieved by slowly introducing a new color alongside the existing one, create a beautiful gradient.
Adding Textural Variations
Combining different string thicknesses and knot types adds depth and texture. Think about pairing thick jute with thin cotton for a striking contrast. Incorporating knots like the square knot or the half hitch knot alongside the basic spiral knot adds visual and tactile interest.
Decorative Elements for a Unique Touch
Small details can personalize your string planters. Handles, made from the same string or a contrasting material, add both functionality and style. Tassels, created by gathering loose string ends, add a bohemian flair. Adding contrasting trim, such as beads or ribbon, provides an extra layer of visual detail. These additions are like the finishing touches on a beautifully decorated room.
Shaping Beyond the Round
While round planters are classic, exploring different shapes allows you to showcase your advanced skills. Oval planters, crafted by adjusting the coil tension, offer a softer look. Square planters, made using a rigid frame, provide a modern, geometric feel. Asymmetrical designs, achieved through creative knotting and shaping, create a unique, artistic statement.
Planning for Success
Just as an architect drafts blueprints, complex designs require careful planning. Sketching your design beforehand helps you visualize the final product and maintain consistent patterns. This pre-planning stage is crucial for successful execution.
By combining these advanced techniques with careful planning, you can create stunning string planters that reflect your personal style. These unique designs make perfect gifts or beautiful additions to your home. Each new technique you learn builds upon your existing skills, guiding you further on your jak zrobić kwietnik ze sznurka journey.
Plant Selection That Works
Creating beautiful string planters (jak zrobić kwietnik ze sznurka) is only half the battle. Selecting the right plants and caring for them properly ensures your handmade creations thrive. This section focuses on what flourishes in these unique containers, addressing drainage, airflow, and moisture.
Plants That Thrive in String Planters
String planters offer a slightly more breathable environment than traditional pots. This makes them ideal for plants that prefer well-draining soil and good air circulation.
-
Trailing Plants: Species like pothos, spider plants, and ivy cascade beautifully over the edges, complementing the planter's texture.
-
Succulents and Cacti: These drought-tolerant plants appreciate the excellent drainage of string planters. Their interesting shapes and textures also create visually appealing displays.
-
Herbs: Many herbs, such as mint, parsley, and oregano, enjoy the airy conditions provided by these planters. Their fragrant leaves add a sensory element to your home.
Creating Proper Drainage
While string planters offer great airflow, they can also dry out quickly. Creating a proper drainage system is vital for plant health and the longevity of your rope work.
-
Lining: Use a coco liner or a piece of burlap to hold the soil while still allowing excess water to drain. This also prevents soil from washing through the knots and staining the string.
-
Pot Inside: Placing a small plastic pot inside the planter provides an additional drainage layer and protects the rope from constant moisture. Be sure to choose a pot with drainage holes.
Soil Selection Strategies
Choosing the right soil mix is crucial for maintaining healthy plant growth without damaging your string work.
-
Well-Draining Mix: A mix specifically designed for cacti and succulents works well, as it allows for proper drainage and prevents root rot.
-
Adding Perlite: Perlite improves aeration and drainage, preventing the soil from becoming too compacted. It also helps to reduce the weight of the planter.
Watering Techniques for String Planters
Watering needs to be adjusted for string planters to prevent both underwatering and overwatering.
-
Soaking Method: Submerge the planter (or the inner pot) in a basin of water for 10-15 minutes, allowing the soil to absorb moisture thoroughly. This mimics natural rainfall and ensures even watering.
-
Check Moisture Levels: Before watering, stick your finger a couple of inches into the soil. If it feels dry, it’s time to water. If it feels damp, wait a bit longer.
Seasonal Care and Troubleshooting
Adjusting your plant care routine based on the seasons is crucial for long-term success.
-
Winter Care: Reduce watering frequency during winter months, as plants typically go dormant. Avoid placing planters near heating vents, which can dry out the air and the plants.
-
Troubleshooting: Yellowing leaves can indicate overwatering, while dry, crispy leaves suggest underwatering. Adjust your watering schedule accordingly.
By carefully considering plant selection, drainage, soil, and watering, you can create beautiful and thriving string planters that will enhance your home decor for years to come. This thoughtful approach transforms your handmade planters from decorative accents into thriving ecosystems.
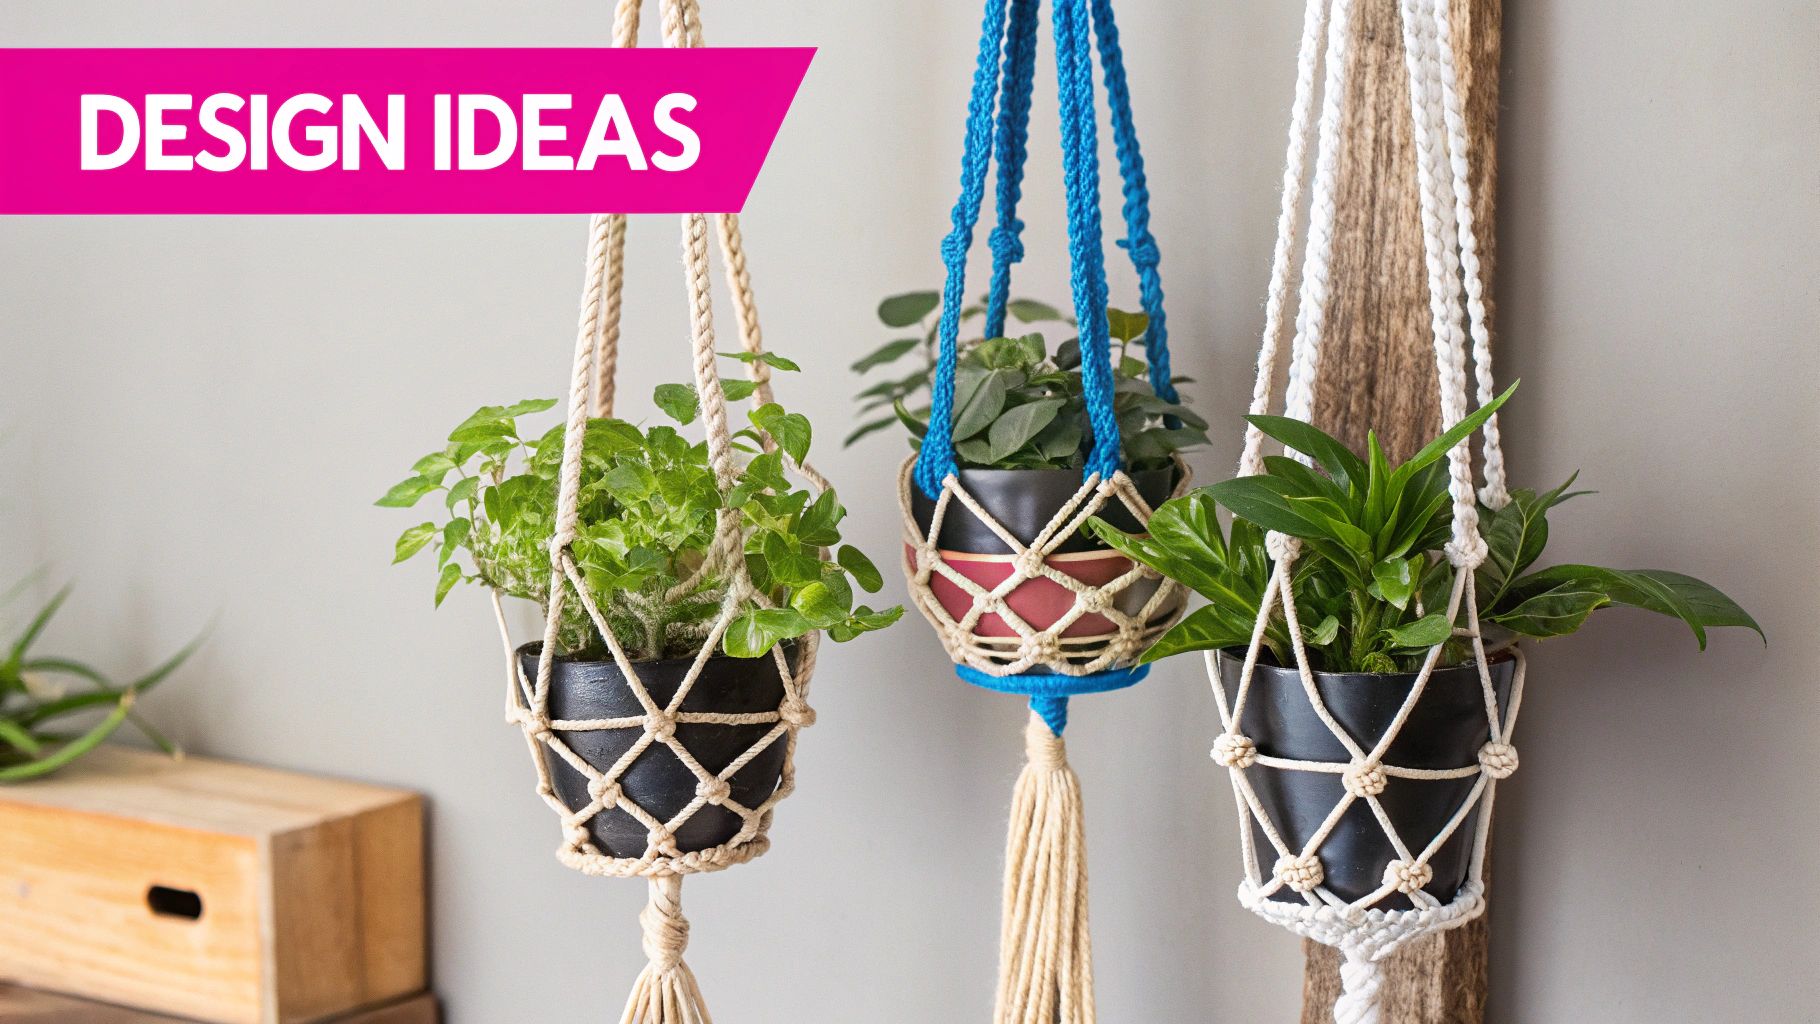
Display Ideas That Showcase Your Work
Your handcrafted string planters, lovingly created using the techniques of jak zrobić kwietnik ze sznurka, deserve a stunning presentation. This section explores display strategies to maximize visual impact, protect your planters, and inspire others.
Integrating Planters With Home Styles
String planters complement various interior design styles. In a bohemian setting, group planters of different lengths and textures to create a relaxed, layered look. A single, well-crafted planter with a sleek, modern plant can make a statement in a minimalist home. Consider your existing decor and select plants and display methods that enhance the overall aesthetic.
Seasonal Decorating Strategies
Refresh your displays seasonally. In spring, fill your planters with bright blooms. Trailing plants create a lush feel for summer. Incorporate dried flowers or branches with warm tones during autumn. Add evergreen sprigs and festive touches for winter. Rotating plants and decorations keeps displays dynamic.
Practical Display Techniques
-
Grouping Planters: Arrange planters in groups of varying heights on shelves, windowsills, or hanging brackets for visual interest. This creates a cohesive display.
-
Lighting Considerations: Proper lighting highlights the texture of your string planters and the plants. Place planters near windows or use spotlights to enhance the details.
-
Indoor and Outdoor Placement: Use weather-resistant string and plants outdoors. Indoors, hang planters from ceilings, place them on shelves, or incorporate them into wall decor. You might be interested in: How to master displaying your beautiful creations.
Showcasing Your Expertise
-
Photography for Social Sharing: High-quality photos showcase your work. Use natural light and a clean background to highlight the details. Sharing online can inspire others to try jak zrobić kwietnik ze sznurka.
-
Themed Displays: Group planters with similar colors, textures, or plant types to tell a story. For example, a collection of succulent planters in varying shades of green creates a calming desert oasis.
-
Focal Points: Use string planters as focal points. Hang a large planter in a prominent location or group smaller planters to complement furniture. This turns your creations into conversation starters.
By using these display strategies, your individual string planters become impressive arrangements. Each planter, crafted with the jak zrobić kwietnik ze sznurka technique, becomes a work of art that enhances your home and reflects your style.
Maintenance Strategies That Extend Planter Life
Caring for your string planters (jak zrobić kwietnik ze sznurka) is essential to keep them looking their best and lasting as long as possible. This section offers practical tips on cleaning, preventing wear and tear, and repairing your handmade planters.
Cleaning Your String Planters
Different rope materials require different cleaning methods. Natural fibers such as jute, cotton, or hemp typically just need a gentle dusting with a soft brush or cloth. For tougher dirt, use a damp cloth, but avoid soaking the planter. This can weaken the fibers and encourage mildew. Synthetic ropes, like nylon or polyester, are more durable and can be cleaned with mild soap and water. Rinse thoroughly and let them dry completely before hanging them back up.
Preventing Wear and Tear
A little preventative care goes a long way in extending the life of your string planters.
-
Avoid Overwatering: Too much water can damage both the rope and the plant. Use a liner and water carefully to ensure proper drainage.
-
Protect from Direct Sunlight: Direct sun can fade natural fibers and weaken synthetic ones. Place your planters in a spot with indirect or filtered light.
-
Regularly Check for Damage: Inspect your planters for loose knots, fraying, or other signs of wear. Fixing these small issues early can prevent bigger problems later.
Repairing Your String Planters
Even with the best care, some wear and tear is inevitable. Luckily, most repairs are fairly simple.
-
Loose Coils: Tighten loose coils by gently adjusting the knots and pulling the string to make it taut.
-
Fraying Edges: Use sharp scissors to trim frayed ends and stop them from unraveling further.
-
Moisture Damage: If moisture discolors the rope, try cleaning it with a damp cloth. For more serious damage, you may need to replace the affected section of rope.
Seasonal Care and Storage
-
Seasonal Adjustments: During the winter, when plants are dormant, water less often. If your planters are outdoors, bring them inside during harsh weather conditions.
-
Storage for Temporary Displays: If you don't display your planters year-round, store them in a cool, dry place away from direct sunlight and moisture.
To help you keep your string planters in top condition, we've created a handy maintenance schedule. This table outlines the tasks you should perform monthly and seasonally, along with the tools you'll need and the approximate time required for each task.
String Planter Maintenance Schedule
Monthly and seasonal maintenance tasks to keep your rope planters in excellent condition
| Task | Frequency | Season | Tools Needed | Time Required |
|---|---|---|---|---|
| Dusting | Monthly | All | Soft brush or cloth | 5 minutes |
| Check for damage | Monthly | All | Visual inspection | 5 minutes |
| Deep clean (if needed) | Every 3 months | Spring/Summer | Damp cloth, mild soap (for synthetic ropes) | 10-15 minutes |
| Tighten loose knots/coils | As needed | All | None | 5 minutes |
| Trim frayed edges | As needed | All | Sharp scissors | 5 minutes |
This schedule provides a good starting point, but you may need to adjust it based on the specific materials and conditions of your planters.
Sometimes, even with your best efforts, a planter might be beyond repair. Knowing when to let go and create something new is part of the crafting process. Learning how to create jak zrobić kwietnik ze sznurka allows you to create beautiful decor and builds valuable maintenance and repair skills.